Lunascape
This would come in incredibly handy for anybody looking to develop their own websites. being able to cascade and view how your website would look on virtually every popular browser in one simple package would save a lot of time.

Monday, 12 November 2012
Sunday, 21 October 2012
New White RAM

Since I had to RMA one of my Corsair sticks that was running at its XMP setting for a few months, I decided to look into something higher end. I had almost surely settled for the sleek looking Corsair Dominator Platinums that everybody wants. Then I stumbled across this by accident. The design looks kinda shit fron the side, but from the top I'm sure it'd be sleek frosty white. Not only that, these run as high as 2800MHz at C11. Though 2400MHz at C9 is much more tempting. Only problem is that they're limited edition in white and I'm about to go on a trip through Asia. Here's hoping they stick around for me!
Friday, 5 October 2012
Why I still choose Firefox
Colour Managed Browsing
Having worked and studied digital media, the importance of colour accuracy has been hammered into me. Firefox allows proper colour managed output so that you see every image as intended. A simple switch by typing about:config into your browser address bar, searching for gfx.color_management.mode and changing the value from 2 to 1.
I like my addons and so I keep using Firefox. Until HTML 5 rolls around as a prominent standard on the web I see no reason to switch to Chrome. In the event that it does, Safari offers all the advantages in HTML 5 that Chrome has, as well as being colour managed.
Monday, 1 October 2012
Hackintosh Mountain Lion
So I've just successfully finished installing my OS X 10.8 onto my old PC for a dual booting solution in hopes that it will sell faster. Surprisingly painless. Of course there was a lot of getting used to and a fair bit of reading before everything finally fell into place. But to be honest, if you knew what you were doing from start to finish, it would take half the time to get it up and running perfectly. It took me about as long as it took to get my Windows 7 install up to my picky standards and that's inclusive of all the researching and trial and error. Just goes to show why the herds flock to macs. It's just that much simpler.
Monday, 24 September 2012
Arkham City PhysX Multi GPU Comparison
So I see a lot of people saying no games use PhysX and that it's actually something of a novelty that never really took off just like EAX by Creative Labs not too long ago. Seeing how phenomenally the recently released Borderlands 2 has made use of it I have to disagree with sceptics. It isn't perfect, but it definitely makes for a much prettier and more realistic environment.

Above you see my set up of two GTX670 SLI with a GT430 and GTX480. Unfortunately I no longer have access to the latter 2 cards used in this test, therefore I can't run a test measuring Borderlands 2 performance. I do however have results testing Arkham City. I've chosen to test under DX11 with everything else turned to maximum setting (obviously PhysX cranked all the way up as well) vsync off at 2560 x 1440 with 4xAA because it is the most intensive scenario within the limits of my system, and more importantly, its what I'd play the game using.

Click to enlarge.
The results were quite interesting. The minimum fps was quite sporadic across the various combinations, but were consistent through multiple runs of each. At first I thought it may have something to do with the two cards connected using an SLI bridge. But after using multiple bridges and a test of dual GTX670s with one dedicated to PhysX and without a bridge, there were no differences in the minimum fps. What also threw me off was the fact that a single GTX670 + GT430 for PhysX had just as low a minimum. These must be anomalies though as there was never a point where I'd see it running at 1 fps for any sustained period of time.
Anyhow, apart from that little anomaly, the average frames and maximum frames give a much clearer indication of PhysX performance. Running with a single GTX670 and offloading the PhysX to the CPU was surprisingly playable (Core i7 3820 @ 4.6GHz). It would drop below 30 more often than I would deem acceptable but it definitely wouldn't come to a sustained crawl at any point. But moving on to the more realistic usage scenarios and we find that a single GTX670 does a fair bit better on average than CPU PhysX. Adding a dedicated PhysX card offered extremely incremental advantages over a single GTX670 with a GT430 actually lowering performance by a couple fps on average while the GTX480 showed 1-2fps increase over the lone card.
Moving onto SLI scores and we see a similar pattern. Whilst the averages remained fairly lacklustre the maximum did jump about 20fps. Adding the GT430 to the SLI GTX670's again saw a lowered average score whilst showing no real world benefit. The GTX480 on the other hand helped a hell of a lot more in SLI pushing the average above the 60fps threshold and the maximum above 100fps.
In conclusion, those opting for a dedicated PhysX card, especially the AMD users, don't bother with any card that would run significantly lower than your main GPU. The GT430 did no good for PhysX at all and it'd be better saving that money and going single GPU. For SLI users, a strong dedicated PhysX card does help, but the extra heat, noise and power draw from having a GTX4/5/670-80 solely for that purpose, not to mention the extra wad of cash you'd be without, is definitely relative to what you value most.
My pick? No dedicated card at all. But if you've got SLI and can afford it:
 One of these might help =)

Above you see my set up of two GTX670 SLI with a GT430 and GTX480. Unfortunately I no longer have access to the latter 2 cards used in this test, therefore I can't run a test measuring Borderlands 2 performance. I do however have results testing Arkham City. I've chosen to test under DX11 with everything else turned to maximum setting (obviously PhysX cranked all the way up as well) vsync off at 2560 x 1440 with 4xAA because it is the most intensive scenario within the limits of my system, and more importantly, its what I'd play the game using.

Click to enlarge.
The results were quite interesting. The minimum fps was quite sporadic across the various combinations, but were consistent through multiple runs of each. At first I thought it may have something to do with the two cards connected using an SLI bridge. But after using multiple bridges and a test of dual GTX670s with one dedicated to PhysX and without a bridge, there were no differences in the minimum fps. What also threw me off was the fact that a single GTX670 + GT430 for PhysX had just as low a minimum. These must be anomalies though as there was never a point where I'd see it running at 1 fps for any sustained period of time.
Anyhow, apart from that little anomaly, the average frames and maximum frames give a much clearer indication of PhysX performance. Running with a single GTX670 and offloading the PhysX to the CPU was surprisingly playable (Core i7 3820 @ 4.6GHz). It would drop below 30 more often than I would deem acceptable but it definitely wouldn't come to a sustained crawl at any point. But moving on to the more realistic usage scenarios and we find that a single GTX670 does a fair bit better on average than CPU PhysX. Adding a dedicated PhysX card offered extremely incremental advantages over a single GTX670 with a GT430 actually lowering performance by a couple fps on average while the GTX480 showed 1-2fps increase over the lone card.
Moving onto SLI scores and we see a similar pattern. Whilst the averages remained fairly lacklustre the maximum did jump about 20fps. Adding the GT430 to the SLI GTX670's again saw a lowered average score whilst showing no real world benefit. The GTX480 on the other hand helped a hell of a lot more in SLI pushing the average above the 60fps threshold and the maximum above 100fps.
In conclusion, those opting for a dedicated PhysX card, especially the AMD users, don't bother with any card that would run significantly lower than your main GPU. The GT430 did no good for PhysX at all and it'd be better saving that money and going single GPU. For SLI users, a strong dedicated PhysX card does help, but the extra heat, noise and power draw from having a GTX4/5/670-80 solely for that purpose, not to mention the extra wad of cash you'd be without, is definitely relative to what you value most.
My pick? No dedicated card at all. But if you've got SLI and can afford it:

Saturday, 8 September 2012
Build 99% complete
So the last thing I needed to set up the X79 came in and I was set to move everything over. I took advantage of having no motherboard in the chassis and nibbled away the rear grill as per ehume in the air flow thread.

 The nibbler is actually quite easy to use. The blade runs at a 180 degree angle perpendicular to the surface being cut as opposed to the 90 degrees that a pair off scissors would.
A downside to this is that its hard to see if your cuts are neat and straight. I made a little mess of things. I'll just throw some U-channel moulding on this later on instead.

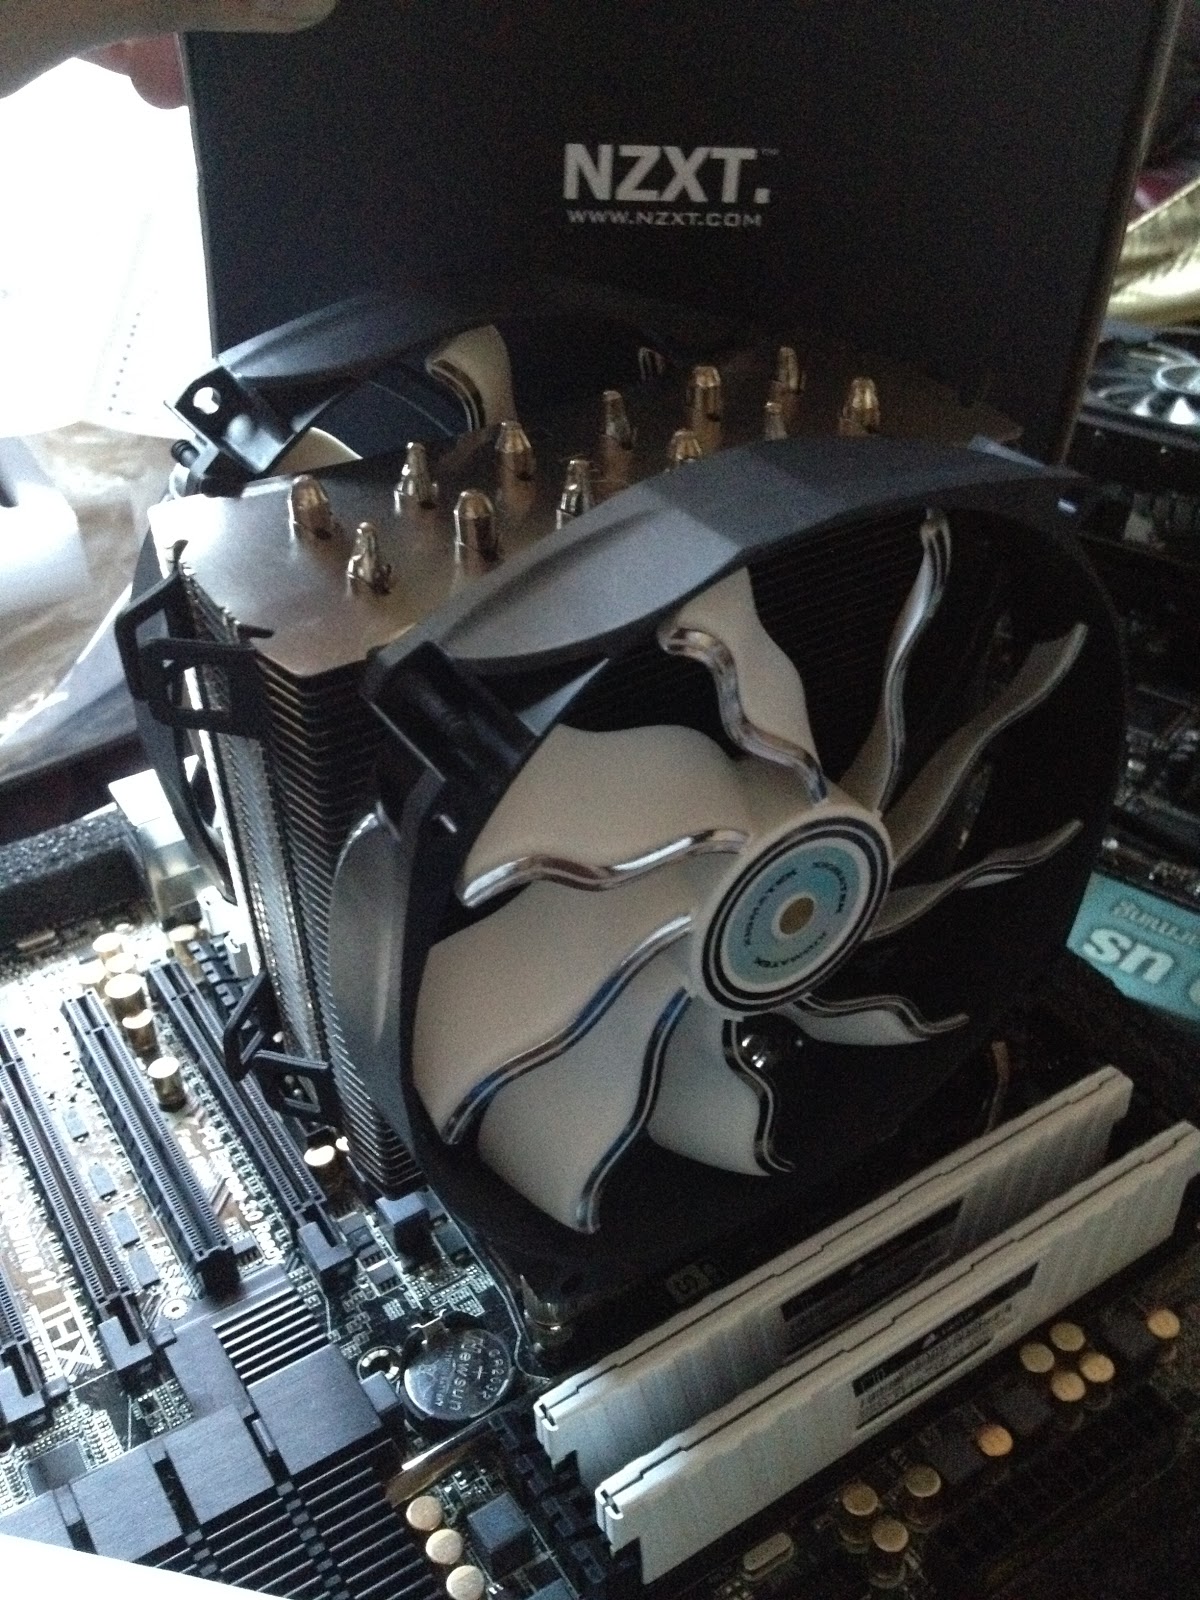
The 2011 mounting screws save a tonne of time with this cooler as well as there is no need for a backplate whatsoever.


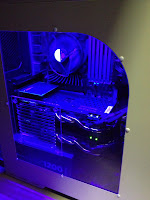
The side panel fitted with the original Havik 140 fan mounted to the side as an intake for the multi GPU setup.

Money shot. I plan to use smaller cold cathodes instead of the long LED so that I can better highlight the white UV components.
Wednesday, 29 August 2012
Spec Ops: The Line Anti Aliasing NVIDIA
UPDATE: After completing my PC upgrade I installed this again with the same settings as below for AA. I noticed it would flicker every few seconds as mentioned below when I turned on SGSSAA. The flicker is a result of the vsync cap being hit and then dropping a frame momentarily. For some reason the MSAA that is forced bugs out for that one dropped frame causing any aliasing to appear for that split second, hence the flickering. To fix this go back into Inspector and set a frame cap at your screen refresh rate -2fps. So for mine it is capped at 58fps. Technically this means that you could have SGSSAA turned on without having any flicker, but in my experiments it actually looked worse than 4xMSAA + FXAA.
Here are my settings:

Spec Ops has no in game AA options, and whilst FXAA works from the NVIDIA control panel, it could use some MSAA.
I've done a quick google search and nothing has pointed to the AA bit for ME2 and ME3. So here it is (click for enlargement):

No AA

FXAA


4xMSAA
4xMSAA + FXAA
Use AA bits 0x080100C5 for the Spec Ops profile in NVIDIA Inspector and add then force your choice of MSAA in. I used 4x. I also added FXAA to smooth out whatever was left. Turns out much better than either by themselves. Look closely at the flag pole and ropes to see the biggest differences. DO NOT use SGSSAA as it causes a flickering mess of things. If you need transparency anti aliasing just use 4x supersampled instead.
Thursday, 23 August 2012
Busted light switch
Ok so in an attempt to allow my cm 690 II's light switch to affect my UV LED, I decided to solder and crimp some molex cables together with some supplies I got from moddiy.com
Ok so after removing and desoldering the initial connection I was fine. Soldering the new connection was a PITA big time.. Reading and watching instructions and then trying to replicate it did not work. The wire I was using wasn't heating up high enough for the tin to melt onto the connection. I ended up having to melt the tin and try to manipulate this blob as it fell onto the connection I was trying to make. Anybody who has soldered before will know that this is pretty much fail.
Anyway after a good 40 minutes I manage to get a decent connection that I was happy with. I then shrunk the heatshrink and it looked great! I couldn't be more pleased with how my first efforts looked. Then I tested it. SUCCESS! The UV would now turn on and off at the click of the switch. At this point I was feeling pretty good about myself. I decided to try and plug the original fan light that the switch was meant for. I felt a sudden jolt through my body and heard a zap bang at my fingertips. The cable fried. It set on fire and I gave myself a mild electric shock. Had I not been wearing my Havaianas it could've been much worse.
After I got the image of an actual fire inside my computer out of my head, I proceeded to place the switch back in its original slot. Here is where shit starts to happen. So the cable was too short to have the molex heads hang behind the motherboard tray. OK no biggie I'll use a molex extension. So I get it in there, and as I'm trying to get the top to close, I see the ground cable I crimped come loose. F*CK.... At this point I'm already pretty over it. I pull it out to attempt a recrimp. I hear a little snap as I pull it but thought nothing of it yet. As I sit down and prepare to fix the loose cable end, I see the little pin that I soldered the wire onto fall off. That was the snap, and that was the end of my first endeavor into cable making. The switch is now dead. Until I can find a replacement, my lights will remain always on. I may just switch to white LEDs. Ah well.
Also I'm fine. Just a little burn on my finger but apart from that I think the fear of seeing flames ignite inside my case was the most I suffered from this ordeal.
Here's hoping for a smooth installation when the Extreme11 arrives!
Wednesday, 22 August 2012
PCIe 3.0 vs PCIe 2.0 scaling
Interesting results from some uber high end builders in this thread:
PCIe 3.0 vs PCIe 2.0 SLI scaling
Just ordered in the rest of my pc parts. Settled for (if you can call it settling =P) the Asrock Extreme11. Just waiting for the shop to get it in then I'll go and pick it up. Will post final pics of build when they're ready. After seeing those results I'm glad I went with it.
Tuesday, 31 July 2012
Current setup
Just a quick pic of how my current setup looks.

Going for a Black to White look from left to right. As you can see, I'm still looking for a motherboard =P

Going for a Black to White look from left to right. As you can see, I'm still looking for a motherboard =P
Monday, 23 July 2012
Impatience and feedback on GK104
So yesterday I got sick of waiting for the inevitable upgrade of my motherboard and CPU and decided I would just "port" my old computer Vesy into her new body retaining what I could and beefing it up with the new parts. I started working on it at about 11am and finished completely at about 11pm. Here are some pics of the process:
 First tower I ever built in. Won't make the mistake of buying just coz its the only one accessible.
 The internals. What a mess....


 At this point, the computer started but there was no monitor signal. This was about 9pm. After another couple hours of trouble shooting, it ended up being as simple as removing the motherboard battery for a few seconds.
So my GPU performance is now enormous. SLI was a little tricky to get my head around but its all good now. The GTX670 is amazing. It has HD Audio bitstreaming as well as not having the silent stream issue that previous nvidia cards suffered from. Some games still see some slowdown but I suspect the SLI profile isn't kicking in. BF3 singleplayer is a constant 59fps though which is perfect.

 The internals. What a mess....
Here's my old Asus P6T Deluxe v2. Not a bad board. It's missing SATA III and USB 3.0 which are about the only things that are worth upgrading for.

Vesy, meet your new body!

Set up the motherboard and seated the GPUs. Made an absolute NOOB mistake of not putting in the raising screws onto the chassis before I seated it. Had to redo that. As you can see there's still some daylight at this point.

Here we have it set up cables and all. Sun is now gone, hence flash. So neat, so clean. Don't mind the lone HDD. That's gonna be gone the moment I get an SSD.

Door closed and all assembled.
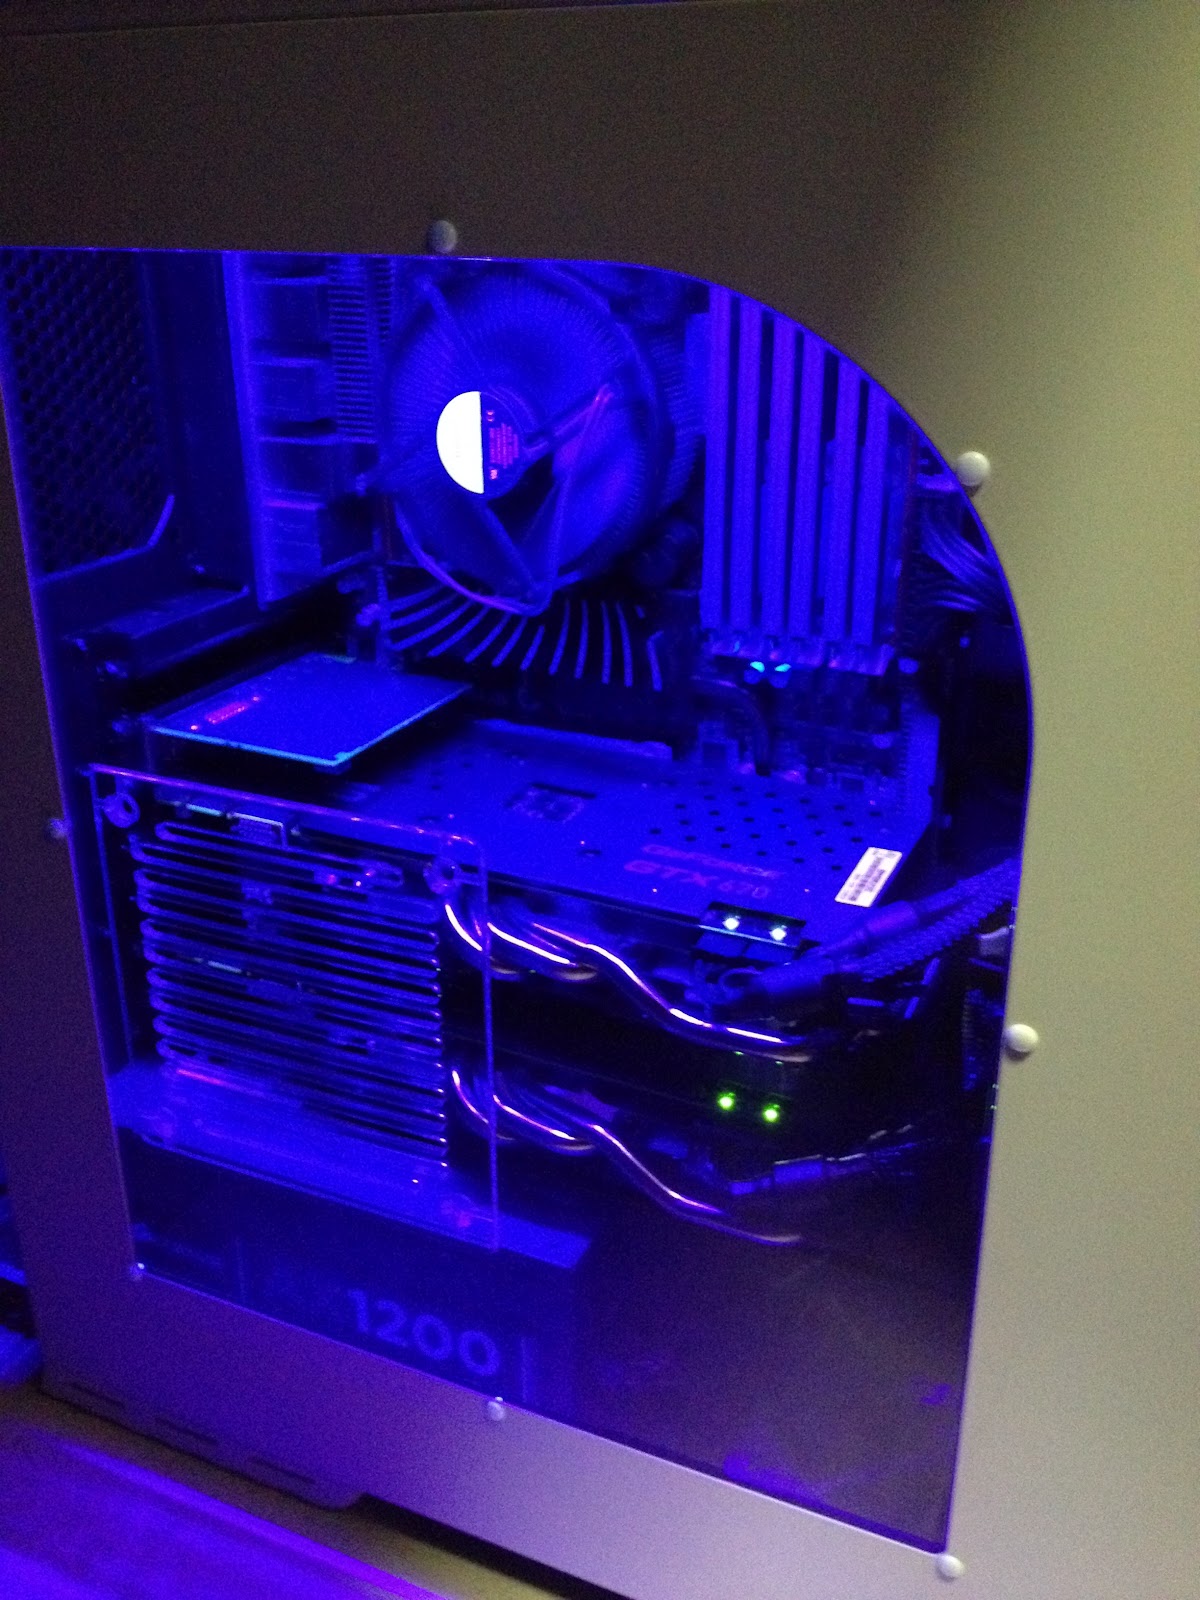
Vesy lives!!! The UV light was probably a bit much. The idea was to light up the white parts of the internals. Unfortunately there isnt much white yet. Not until the upgrade anyway. Also seems that not everything white will light up. Need to figure out lighting at a later point.

So my GPU performance is now enormous. SLI was a little tricky to get my head around but its all good now. The GTX670 is amazing. It has HD Audio bitstreaming as well as not having the silent stream issue that previous nvidia cards suffered from. Some games still see some slowdown but I suspect the SLI profile isn't kicking in. BF3 singleplayer is a constant 59fps though which is perfect.
Wednesday, 18 July 2012
New indecisions regarding Z77 vs X79
Having researched long and hard, whilst also waiting for the release of several motherboards, I am now quite on the fence of whether or not I should go for the X79 option or the Z77 option. The main thing that keeps X79 so enticing is the fact that 40 PCIe lanes are just perfect for the set up I'm going for. Also the incredible impact Sandy Bridge E can bring to CPU heavy games such as Battlefield 3. On the other hand, Z77 has started to look more and more like an worthwhile choice. Especially with the Asus Maximus V Extreme soon to hit shelves. The gaming performance will likely match and even surpass SB-E in most titles. Along with a thunderbolt port, a PLX chip for better multi card PCIe support, and an mSATA mPCIe combo card, Z77 has never looked so good. Right now I think it's just become a race to see which one is released in Aus first. Also price wise, it needs to be significantly less inflated over the US pricing for me to consider.
So here are the contenders:
 ASRock Extreme 11.
It has almost everything I ever wanted in a motherboard. The only thing that would top it off would be a dedicated HDMI out that could carry the Sound blaster signal. Pricing shouldn't exceed $500 otherwise this board would definitely be pushing beyond what people will be willing to pay.
 GA-X79-UP4.
Previously mentioned, barebones type board with 2 important things; 8 DIMM and 4 way SLI capability. Not that I'd use 4 way sli, but because that extra x16 slot would come in useful for something. Also the ultra durable 5 temperature reduction should allow me to run my fans a little slower if they seem a bit noisy. Needs to be priced a little below $300 to make it a steal.
 ASUS ROG Maximus V Extreme.
The Z77 killer board. A gaming board with Thunderbolt was already pretty enticing. Add 4 way SLI, and the ability to add an mSATA SSD and it's almost too good to pass up. If priced close to the $300 mark this one will be a keeper.
So here are the contenders:
It has almost everything I ever wanted in a motherboard. The only thing that would top it off would be a dedicated HDMI out that could carry the Sound blaster signal. Pricing shouldn't exceed $500 otherwise this board would definitely be pushing beyond what people will be willing to pay.

Previously mentioned, barebones type board with 2 important things; 8 DIMM and 4 way SLI capability. Not that I'd use 4 way sli, but because that extra x16 slot would come in useful for something. Also the ultra durable 5 temperature reduction should allow me to run my fans a little slower if they seem a bit noisy. Needs to be priced a little below $300 to make it a steal.
The Z77 killer board. A gaming board with Thunderbolt was already pretty enticing. Add 4 way SLI, and the ability to add an mSATA SSD and it's almost too good to pass up. If priced close to the $300 mark this one will be a keeper.
Wednesday, 4 July 2012
The Little Details
With the finalisation of my build looking likely in 2 months, the nitty gritty details such as cables, fans and lights are the final pieces of the puzzle.
Cables
The Corsair AX1200 individually sleeved modular cables will be the best bet for PSU custom cables. They are simpler, turn out cheaper than buying individual extensions, and don't add any possible weaker links in the chain of power that extensions do.

That takes care of the power cables so all that's left are the internal connector cables, i.e. Power/reset pins, internal USB headers , fan headers, and SATA cables. After a bit of research, Bitfenix makes an Alchemy line of cables that are all sleeved and has all the above covered.

Fans


Xigmatek CLF Crystal 140 White for any 140 mm LED fans required.

Cables
The Corsair AX1200 individually sleeved modular cables will be the best bet for PSU custom cables. They are simpler, turn out cheaper than buying individual extensions, and don't add any possible weaker links in the chain of power that extensions do.
That takes care of the power cables so all that's left are the internal connector cables, i.e. Power/reset pins, internal USB headers , fan headers, and SATA cables. After a bit of research, Bitfenix makes an Alchemy line of cables that are all sleeved and has all the above covered.
Fans
All fans need to be pushing decent air as well as remaining as quiet as the other components I have chosen. A great resource I found was this MASSIVE roundup review of chassis fans: 393 Case Fans Reviewed
Nexus Real Silent Case Fan 120mm Black/White would make a suitable black and white fan to use for the case interior where LED lights aren't needed.
Nexus Silent Fan White LED 120mm would be the perfect window fan as it is transparent and lights up white. The PWM version is also tempting.
Xigmatek XAF-F145x as the PWM intake fan would be ideal if the NZXT Havik's speed adjustments match it as they seem to be identical in design and may be from the same OEM. There are a few different versions. The main ones of interest are the 1451 - Black, 1452 - Black with white fan, and 1454 - Transparent black with white LED.


These fans should be more than enough to keep my system cool using the positive flow diagram previously referred to, whilst also keeping noise to a minimum wherever possible. They'd also provide ample lighting for the inside of the case.
Monday, 2 July 2012
Parts arrived
So nearing the end of my trip here in California, I've managed to get a good chunk of my parts ordered in and received. I have my 2 x GTX 670 DirectCU IIs, the Corsair AX1200 PSU, 4 x 4GB Corsair Vengeance Arctic White DIMMs. Also got my Wyse moogle kit infor my keyboard =)
When I get back to Sydney the only things I'll really need are the CM 690 II Advanced Black and White case, the NZXT Havik 140 CPU cooler, the GA-X79-UP4 (I'm still waiting on a release date for this thing), and an SSD which I am still up in the air about.
The Samsung 830 or Intel 520 seem to be the best bet for MLC flash longevity, however with SLC coming to the consumer market in the form of the SuperSSpeed S301, it may just be worth holding out for.
I am still waiting on another order to arrive. The XIM Edge console mouse and keyboard adapter.

I'll have a little update on this when I get to test it out =) From what I've seen it is a huge upgrade over the original XIM.
Will post pics when I'm safely back in Aus putting this thing together.
When I get back to Sydney the only things I'll really need are the CM 690 II Advanced Black and White case, the NZXT Havik 140 CPU cooler, the GA-X79-UP4 (I'm still waiting on a release date for this thing), and an SSD which I am still up in the air about.
The Samsung 830 or Intel 520 seem to be the best bet for MLC flash longevity, however with SLC coming to the consumer market in the form of the SuperSSpeed S301, it may just be worth holding out for.
I am still waiting on another order to arrive. The XIM Edge console mouse and keyboard adapter.
I'll have a little update on this when I get to test it out =) From what I've seen it is a huge upgrade over the original XIM.
Will post pics when I'm safely back in Aus putting this thing together.
Tuesday, 19 June 2012
Build Revisions
So being in California for a month means I have access to Amazon's much cheaper computer parts as well as free shipping! Taking that into account I can now slot the awesome Corsair AX1200 PSU into my build rather than the Silent Pro Hybrid.

Even though its got 100w less and has no fan controller included, it is slightly larger in dimension allowing for better heat dissipation and adds a nice gold accent to the aesthetic of my case. It's very subtle but would look quite nice in amongst the rest of the noir scheme.
 I could wait for this iteration of the same PSU being released later this year, however it'd be $100 more and has much too strong of a red accent to go with my selection of (or lack of) colours. It is however 80 plus platinum rated rather than just gold rated. It also has a digital power manager that allows real time updates through the OS which is very neat. Unfortunately the AX1200i will be incredibly inflated when it hits the shores of AU.
Something I can wait for is this nifty little upgrade to the previously selected GA-X79-UD3. This is the GA-X79-UP4. It has an upgraded power management system which I'll have to read up more about when it gets a release, 4 extra DIMM slots and some extra SATA ports amongst other things. The DIMM slots will mean that should I somehow run low with 16gb of RAM, the 32GB option will be there =D
 Here is something I've already managed to get shipped in. A couple of slim slot loading drives of the SONY variety. One is a standard DVD writer and the other a BD reader. Since my previous build used a $300 LG BD writer and I only ever used it to rip BD movies to an external for playing on my VAIO, I figured it best to go with a reader only option. My wallet also thanked me for saving it the $400 premium on slim slot loading BD writer. A neat little 5.25" tray that will hold both means there is less clogging of the bays so I can fit an extra fan for airflow. I'll use a mesh style contact paper sheet with the slots and eject button cut out so that it better matches the mesh grill of the rest of the case.
SSD selection will also likely change in the near future. Samsung 830 prices are quite reasonable and also seem to be a lot more reliable than most. Intel would be great but the price on their 520 line is just not worth the performance ratio. Corsair also has a Neutron GTX line that seems to show incredible performance stats that may also make the final cut.

Even though its got 100w less and has no fan controller included, it is slightly larger in dimension allowing for better heat dissipation and adds a nice gold accent to the aesthetic of my case. It's very subtle but would look quite nice in amongst the rest of the noir scheme.


SSD selection will also likely change in the near future. Samsung 830 prices are quite reasonable and also seem to be a lot more reliable than most. Intel would be great but the price on their 520 line is just not worth the performance ratio. Corsair also has a Neutron GTX line that seems to show incredible performance stats that may also make the final cut.
Wednesday, 30 May 2012
Battlefield 3 Headset

Keycaps for my CM Storm Quickfire Rapid

WOOH! Just need a WYSE moogle spacebar and unstepped capslock! Depending on whether the dolch moogle windows and menu key match the frame colour more I may pop them in as well.
Wednesday, 23 May 2012
Build revisions and airflow management
So after doing some further extensive research, the GTX 690 (even though its an amazing looking card and possibly the best engineered piece of pc hardware in terms of the consumer market) is just way too overpriced and scarce to remain in this build as a viable option. In the end, my current set up of a single 2560 x 1440 display will be very comfortably run with a dual GTX 670 set up with a possible expansion to a third should things get hairy. 3 of those would actually come to about the price of 1 GTX 690 so not all is a compromise. Sure there will be some drawbacks in regards to PCIe lanes but at the resolution I need there won't likely be an issue with losing 1 or 2 fps. Onto the custom makes and clocks then! I've found the perfect card in the ASUS Geforce GTX 670 DirectCU II TOP. It's extremely quiet. Almost 10 dB quieter than my current set up of 1 GTX 480. Add to that the fact that it pushes at clock speeds higher than a standard GTX 680 and its an absolute winner! Theres also a slick rear backplate that, along with the heatpipes, compliments my black and white colour scheme perfectly. The red accents won't be visible with the cards pointed downwards so that isn't an issue at all.

One thing that I do have to take close note of is that the cooler design, whilst amazing and very efficient in its purpose of keeping the GPU quiet and cool, is also releasing hot air back into the chassis rather than all out its rear. Because of that I will need to keep the cooler well ventilated. So I did a little research into positive and negative airflow and how to keep my case at good temperatures purely on air. I came across this incredible thread on overclock.net (How to decide on a case for air cooling) that outlines how positive airflow allows a case to be kept cool at lower fan RPMs, and consequently, lower noise levels. The diagram below is from the thread's original poster ehume. The rest of the thread is filled with users reporting amazing results using this theory as a basis.
 Basically rather than a case with negative pressure (more exhaust fans than intake fans) or positive pressure (more intake fans than exhaust fans) a positive 'flow' is the approach taken. There are no exhaust fans and the rear expansion slots and fan grill are removed to allow an open flow of hot air out the back of the chassis. The rest of the case is then fitted with fans taking in air which forces all hot air in one direction whilst allowing a constant flow of cool air over the main components. Since there is no fan that hot air is being filtered through, the exhaust simply flows out as fast as it can rather than waiting in line for the gate like exhaust fan to push it through. This actually requires the physical destruction of the rear fan grill if the chassis has one. So I may go for an exhaust fan at higher RPM to first see how that goes for me. Another interesting fact that is mentioned is that because the case will always be filled with air in almost every nook dust hardly ever settles, so the case remains virtually dust free. That definitely is something to look forward to!
One final thing I must mention is that due to the nature of my builds colour scheme, and the choice of the GA-X79-UD3 motherboard, I have limited my SATA III ports. A quick bit of research brings to my attention the IBM M1015 pcie expansion card that brings with it the flexibility of 8 SATA 6Gb/s for some awesome RAID setups. May just be the thing I need if I ever require more than 2 SSDs.
One thing that I do have to take close note of is that the cooler design, whilst amazing and very efficient in its purpose of keeping the GPU quiet and cool, is also releasing hot air back into the chassis rather than all out its rear. Because of that I will need to keep the cooler well ventilated. So I did a little research into positive and negative airflow and how to keep my case at good temperatures purely on air. I came across this incredible thread on overclock.net (How to decide on a case for air cooling) that outlines how positive airflow allows a case to be kept cool at lower fan RPMs, and consequently, lower noise levels. The diagram below is from the thread's original poster ehume. The rest of the thread is filled with users reporting amazing results using this theory as a basis.
One final thing I must mention is that due to the nature of my builds colour scheme, and the choice of the GA-X79-UD3 motherboard, I have limited my SATA III ports. A quick bit of research brings to my attention the IBM M1015 pcie expansion card that brings with it the flexibility of 8 SATA 6Gb/s for some awesome RAID setups. May just be the thing I need if I ever require more than 2 SSDs.
Sunday, 20 May 2012
New PC build.
Currently contemplating my first full overhaul of my old power hungry cow of a computer whom I've aptly named Vesy.
I've been thinking plenty about it for the last few months but I'm still waiting for the perfect components for my needs. Being as anal as I am about how things should work, those parts will likely never be available in my lifetime. But here's what I'm settling on so far:
 CHASSIS
CM 690 II Advanced Black and White Windowed
Figured it'd be nice to get away from the drab of an all black case whilst still being able to use a black drive without it looking out of place. Also that vertical PCI expansion slot gives some ideas about PCIe risers and taking advantage of a blocked PCIe 1x slot under a GPU.
 MAINBOARD
GIGABYTE GA-X79-UD3
Black design with grey accents will keep to my colour scheme. No nonsense extras mean the price stays down. Only thing I'd crave are an extra 4 DIMM slots but then again, half the slots usually means being able to fiddle further with RAM timings and clock speeds. Also 4 way SLI compatible if that route ever becomes worthwhile.
 PSU
PSU
Cooler Master Silent Pro Hybrid 1300W
Fully modular, nice exterior texture, fan controller included, and a colour scheme that matches my chassis selection. Also cheaper than a lot of 1000W units. Only gripe is that ugly 24-pin connector. Custom single sleeved alternative must be looked into.
 GPU
GPU
Current options: GTX690 or GK110
Currently all GTX690s look the same regardless of the manufacturer. They look mighty fine so that's no problem. Here's hoping nVidia keeps it up with the GK110 if it ever gets a consumer release.
 CPU
CPU
Intel Core i7 3930K
6 cores and unlocked multiplier. Not game enough to go with the 3960X since I'm not watercooling.
 COOLER
NZXT HAVIK 140
Silent operation and close to AIO water cooled temps. Black and white fans are an awesome touch!
Currently trying to find out what's needed to get it compatible with an LGA2011 socket. If it won't work then Noctua's NH-D14 is the next contender without sacrificing any performance at all.
 RAM
RAM
Corsair Vengeance Low Profile
The only white heatspreaders around these days. Depending on how expensive a kit will be in comparison to the non limited black version I may go with that although voltage drops in efficiency to 1.5v.
 SSD
SSD
SanDisk Extreme Solid State Drive 240GB
The fastest SF-2281 drive available and for just over $1 p/GB this is handsdown the best value to performance component in this system.
Current total based on staticice Australia's cheapest prices: $3,170 before shipping.
I've been thinking plenty about it for the last few months but I'm still waiting for the perfect components for my needs. Being as anal as I am about how things should work, those parts will likely never be available in my lifetime. But here's what I'm settling on so far:

CM 690 II Advanced Black and White Windowed
Figured it'd be nice to get away from the drab of an all black case whilst still being able to use a black drive without it looking out of place. Also that vertical PCI expansion slot gives some ideas about PCIe risers and taking advantage of a blocked PCIe 1x slot under a GPU.

GIGABYTE GA-X79-UD3
Black design with grey accents will keep to my colour scheme. No nonsense extras mean the price stays down. Only thing I'd crave are an extra 4 DIMM slots but then again, half the slots usually means being able to fiddle further with RAM timings and clock speeds. Also 4 way SLI compatible if that route ever becomes worthwhile.

Cooler Master Silent Pro Hybrid 1300W
Fully modular, nice exterior texture, fan controller included, and a colour scheme that matches my chassis selection. Also cheaper than a lot of 1000W units. Only gripe is that ugly 24-pin connector. Custom single sleeved alternative must be looked into.

Current options: GTX690 or GK110
Currently all GTX690s look the same regardless of the manufacturer. They look mighty fine so that's no problem. Here's hoping nVidia keeps it up with the GK110 if it ever gets a consumer release.

Intel Core i7 3930K
6 cores and unlocked multiplier. Not game enough to go with the 3960X since I'm not watercooling.

NZXT HAVIK 140
Silent operation and close to AIO water cooled temps. Black and white fans are an awesome touch!
Currently trying to find out what's needed to get it compatible with an LGA2011 socket. If it won't work then Noctua's NH-D14 is the next contender without sacrificing any performance at all.

Corsair Vengeance Low Profile
The only white heatspreaders around these days. Depending on how expensive a kit will be in comparison to the non limited black version I may go with that although voltage drops in efficiency to 1.5v.

SanDisk Extreme Solid State Drive 240GB
The fastest SF-2281 drive available and for just over $1 p/GB this is handsdown the best value to performance component in this system.
Current total based on staticice Australia's cheapest prices: $3,170 before shipping.
Subscribe to:
Posts (Atom)